Add Buttons to Text Fields Inside Modules
By Divi Dude
One of the areas that Divi could improve upon is adding a way to add a button to a module with a text field. Luckily, in this tutorial, I explain how.
Step 1: Add Row
The first thing you’re going to do is add a row. Don’t worry about size or how many columns or anything, because we will be deleting it shortly.
Now insert a Button Module into the row. Just use # for the URL. We’ll be using this module to get the code we’ll use to create a button.
Also, I find it helpful to open a text editor separately. I use Notepad or Notepad++ on my PC but use whatever is easiest for you. I do this so I have a handy place to put the code that I’m going to copy and paste without having to constantly open and close modules.
Step 2: Style Button
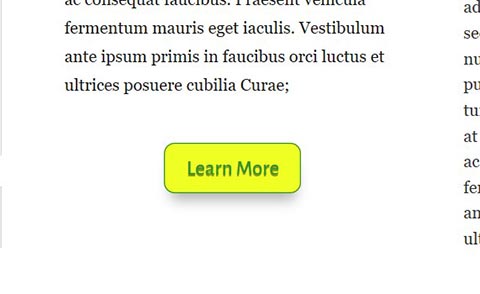
Go through the button settings and style the button the way you want. In our example below we made a yellow button with green text. We also added shadows and a border radius and border.
Step 3: Use Inspect for HTML Code
Right click on the button you just styled and choose Inspect. You’ll want to copy the html code. It will look like the code below. Paste that code into your open text editor (from my suggestion is Step 1) so you have it handy.
<a class="et_pb_button et_pb_button_0 et_pb_bg_layout_light" href="#">Learn More</a>Step 4: Use Inspect for CSS
Right click on the button you just styled and choose Inspect. You’ll want to copy the class rules. Be sure to copy all the CSS that corresponds to the button you created. In our case, we look for all rules that are for .et_pb_button_0.
Paste the code you copied into the custom CSS panel of your choosing (whether you use Theme Options, Theme Customizer or your child theme).
After you paste it you will need to give the button a unique class name. The key here is to change the 0 (or whatever number has been assigned to the button you created) to a unique number (or you can change the name altogether, I just find it easier to change the number). In my case, I change the name to .et_pb_button_99.
Here is the CSS we copied for the button we styled (see above photo).

body #page-container .et_pb_section .et_pb_button_99 {
    color: #32952d !important;
    border-width: 1px !important;
    border-radius: 10px;
    font-family: "Alegreya Sans",Helvetica,Arial,Lucida,sans-serif !important;
    background-color: #f0ff23;
  display: inline-block;
}
.et_pb_button_99:hover {
    border: 2px solid transparent;
    padding: .3em 2em .3em .7em;
}
.et_pb_button_99, .et_pb_button_99::after {
    transition: all 300ms ease 0ms;
}
.et_pb_button_99 {
    text-shadow: 0em 0.08em 0em rgba(0,0,0,0.4);
    box-shadow: 0px 12px 18px -6px rgba(0,0,0,0.3);
}
Step 5: Open Module with Text Field
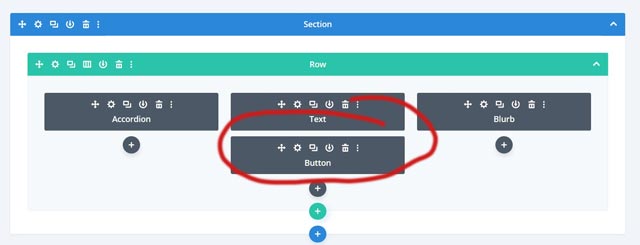
Now you’ll open any module that has a place to add your own text. So modules like Blurb, Accordion, Text and others will work here.
Go to the text area and makes sure the Text Tab is chosen (and not the Visual Tab). You want to be in the place that you can put your code in.
Now paste the code you copied in the previous step. If you want the button centered, then open the Visual Tab, place your cursor just before the button and hit the center button in the TinyMCE.
Do this in any module where you want your button entered.
It will look something like this:
Video on How to Add Buttons to Text Modules
I’ve created two videos that showcase how to do what I just described above. The first video shows how to add a button. The second video shows how to stylize the button.
Video #1 Add Buttons to Text Fields Inside Modules
Video #2 Customize Buttons in Text Fields
Must Have Plugins


Favorite WordPress Theme

Start Your Newsletter

Affiliate marketer: Which means when you click a link and purchase an item, I may receive a commission.
More From Divi Dude

3 Easy Ways to Add Pinterest Board Pins to Divi Websites Without Plugins
Here’s the dilemma. When I build websites, I build them primarily for a landscape screen. Most of my photos are optimized for landscape screens. My Facebook and Twitter graphics are for landscape screens. But Pinterest prefers portrait style graphics for its pin boards. See the problem? My website has graphics that are wider than they are long (landscape). Yet, Pinterest wants graphics that are taller than they are wide (portrait).

MailerLite is an affordable, easy-to-use newsletter and email marketing platform
For the longest time I used MailChimp. I was drawn to the 2,000 free subscribers.
But when MailChimp changed how they defined subscribers and made some other not so user friendly changes, I started looking for alternatives. Not just for the free tier, but for my paid subscriber lists (I have clients that send out newsletters and they need more bang for the buck than what many free tier offers).

Delete Spam Comments in Bulk Without Plugin on Cloudways
Sometimes you screw up and forget to turn off comments on your WordPress website, or forget to configure your Askimet, or do both, and then you end up with thousands of comments that are nothing but spam. We’re talking hundreds of pages worth of comments that need to…

I tried this.
I created a button and styled it how I wanted it, then went into the developer console and copied the html/styles.
But when I deleted the original button that I had copied the html from, this broke every single other button on the whole site. Presumably, DIVI creates separate classes for every single module if you customise it, and deletes those classes if the button gets deleted. So anything else that is using those classes get broken.
I have the same problem! Did you find a solution? Would love to know!!