Customize / Change Submit Button Text in Contact Form
By Divi Dude
Nothing in life is easy. Although, often times Divi seems to be the exception to the rule. Well, not when trying to change the text of the submit button in the contact form module. Don’t get me wrong, it is easy to do, just not to figure out how to do. You see, there is no place within Divi to customize it. Not in the Contact Form module; nor in the Module Customizer > Contact Form. To change it, you have to mess with javascript. Yikes.
Wait, this page is supposed to show you how to do it, not scare you away. Sorry, sometimes I forget my role. It’s actually quite simple. Here’s a tutorial I did that shows how … or you can find step-by-step instructions below the video. Whichever is easier for you to follow.
Change Divi’s Submit Button Instructions
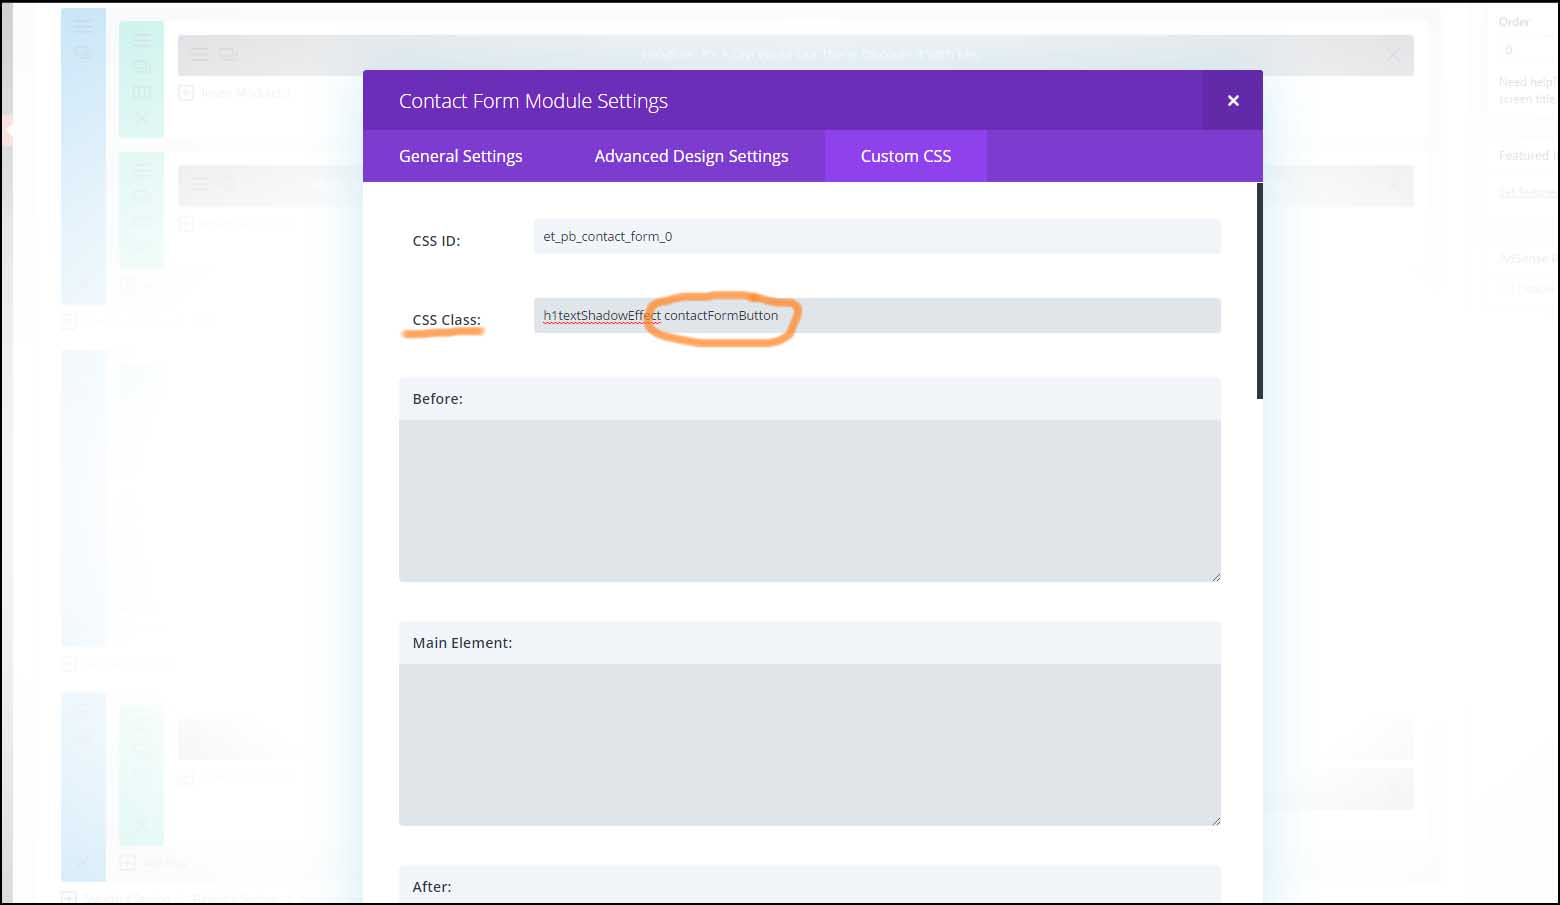
Step 1: Log into your Divi theme, go to the page with your contact module and open up the module so you see the picture below.

Step 2: Click on the Custom CSS tab and in the CSS Class field enter a custom name. For the purpose of this tutorial in the video above I entered: customContactButton.
Step 3: Save module and update page.
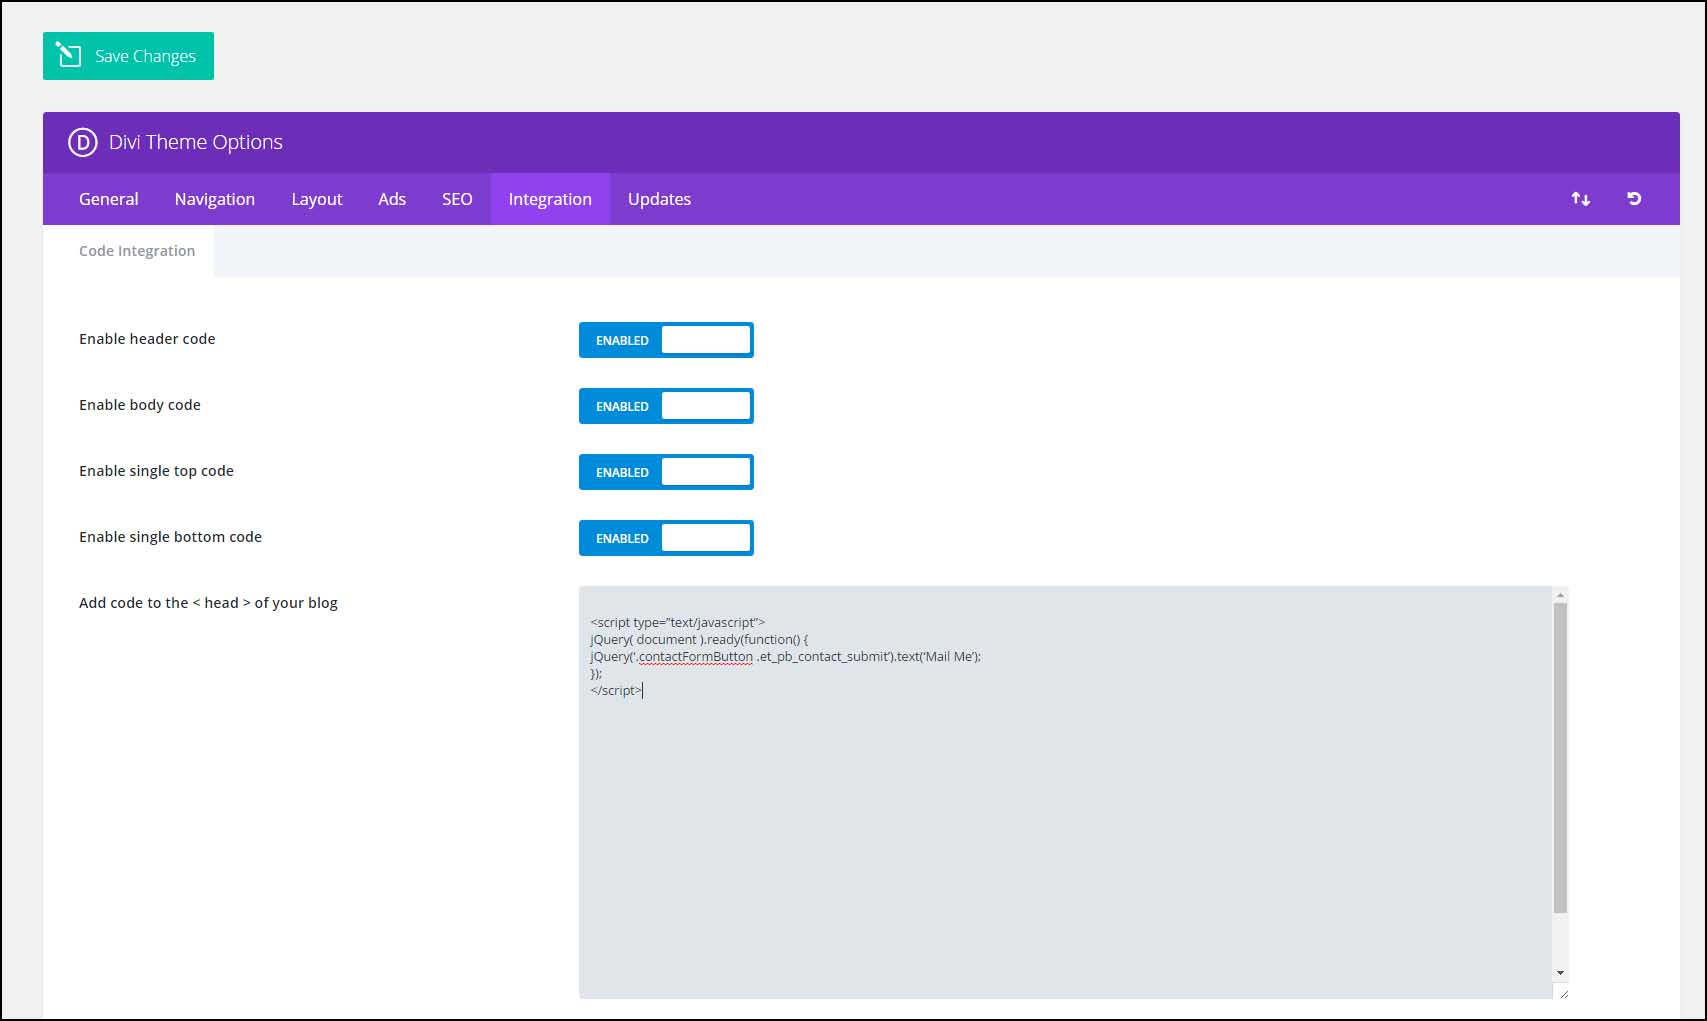
Step 4: Go to the Divi Theme Options in the righthand menu and click on the Integration tab.
Step 5: Enter the following code in the “Add code to the HEAD of your blog” field. (see picture below).
<script type= "text/javascript">
jQuery( document ).ready(function() {
jQuery('.CUSTOM_CLASS_NAME_HERE .et_pb_contact_submit').text('CUSTOM_TEXT_HERE');
});
</script>
Step 6: Replace CUSTOM_CLASS_NAME_HERE with what you entered in Step 2. For the purpose of the video above, I entered .customContactButton (be sure to include the dot here; but not in step 2).
Step 7: Replace CUSTOM_TEXT_HERE with whatever you want the button to say. This will replace the “Submit” word. So enter ‘Send’ or ‘Mail’ or whatever you want. For the purpose of the video above, I entered ‘Mail Me’.
Step 8: Save changes.
Step 9: Go to your page with the contact module and see the change (you may need to refresh).
Affiliate marketer: Which means when you click a link and purchase an item, I may receive a commission.
More From Divi Dude
Delete Spam Comments in Bulk Without Plugin on Cloudways
Sometimes you screw up and forget to turn off comments on your WordPress website, or forget to configure your Askimet, or do both, and then you end up with thousands of comments that are nothing but spam. We’re talking hundreds of pages worth of comments that need to…
MailerLite is an affordable, easy-to-use newsletter and email marketing platform
For the longest time I used MailChimp. I was drawn to the 2,000 free subscribers.
But when MailChimp changed how they defined subscribers and made some other not so user friendly changes, I started looking for alternatives. Not just for the free tier, but for my paid subscriber lists (I have clients that send out newsletters and they need more bang for the buck than what many free tier offers).
Delete Spam Comments in Bulk Without Plugin on Cloudways
Sometimes you screw up and forget to turn off comments on your WordPress website, or forget to configure your Askimet, or do both, and then you end up with thousands of comments that are nothing but spam. We’re talking hundreds of pages worth of comments that need to…


I have tried to get this to work for me. I have double checked the code and put the codes where they are to go and it is still not working for me.
Yikes! Sorry it’s not working. In Step 5, did you try and retyping the code (and not cutting and pasting)? When I first did this on this page, I had no issues. When I recreated it for the tutorial on my desktop computer, it didn’t work the first time. The reason was the code wasn’t recognized when I cut and pasted it. Try retyping and see if it works (you can first try just retyping the <> at the beginning and end; and if that doesn’t work try retyping it all). Hope this helps. Please let me know. Thanks.
Thanks for this Divi Dude. And just to verify, copy and pasting did not work for me either. Nor did just changing out all the . Retyping the whole code worked just fine though. Thanks again.
Thanks for the verification. I will make it more clear in the write up that it needs to be retyped.
Hi! Thank so much for this tip. I normalize your code in a text editor (sublime), and the problem is in quotation marks. Maybe you can use a section to post raw code to prevent future problems.
Thanks a lot D. Dude!!
Retyping worked for me 🙂
Good to know. Thanks.
Hi DiviDude.
Ty so much for this guide, it’s very helpfull. One thing, I notice that in step five you forgot to write the end tag of the script </script>(not in the video obv). Anyway thank you again, you save me.
Glad it worked for you. And thanks for pointing out the missing code, I have added it. 🙂
Appreciate the code snippet. Copy & Paste did not work, but typing it did. Be sure to put a space between .CUSTOM_CLASS_NAME_HERE and .et_pb_contact_submit I made this mistake the first time that I typed it.
bro yo avatar looks like you caught the cancer, use tha dodge tool in photoshop to lighten up them eyebahgz
Haha. I used the burn tool in Photoshop to darken them. 😉
Hey Divi Dude,
Thanks very much for sharing your experience on how to change the button text using the divi theme. I am using divi from last 6 years and i like to learn new things. I will use this technique on my future projects.
Best Regards.
Shahzad Raza
Thanks.