3 Easy Ways to Add Pinterest Board Pins to Divi Websites Without Plugins
By Divi Dude
So how you do you create graphics that can be pinned on Pinterest Boards in Divi without ruining the look and feel of your site, and without having to add an additional plugin?
Easy. Build them into your style or hide them. Let me show you how I do it.
The first thing I do is create the graphic at the Pinterest preferred size of 735px (wide) x 1102px (high). I use Photoshop to create all my graphics, and then Short Pixel to image compress them even further.
If you’re looking for an alternative to Photoshop, then you might want to give Fotor a try. The link will open in a new tab, so you can keep reading this Pinterest tutorial.
And before I forget, don’t forget to sign up for Tailwinds if you are serious about using Pinterest for yourself or your clients. The provided link will open in a new window so you can continue reading this tutorial. But click on it now so you don’t forget.
Pinterest Method 1: The Pin-It Picture Method
If you look on the right of this post (or below it if you’re on mobile), you will see a graphic that looks like it can be a Pinterest Board title card (or I guess Pin is the correct term). That’s because it is. I am even kind enough to give the reader the suggestion to pin it. If you click on the graphic, or on the text that reads “Please Pin Me” it will take you to your Pinterest Board where you can now share my wisdom for all the world to read.
In this example I have a sidebar with widgets. I do not place my graphic or title within the sidebar, but rather above it. Since I have my sidebars styled using CSS, I want to make sure my title has a similar look and feel (although I switch colors to make it stand out). If you want to know how to customize the sidebar headers in Divi, I have written this tutorial that shows you how to do it.
Step 1
Your website should have a sidebar for this to work, or at least two or more columns. Otherwise, you are just going to put the image in your main content.
I use a column that is 3/4 left and 1/4 right (or you can use 2/3 left and 1/3 right). If you prefer your sidebar on the other side, then flip those dimensions.
In my example I have the pin image as the very first item in the sidebar. And then below it is the rest of the stuff in the sidebar which is set up in the Widget area (not important to this tutorial).
The very first item is a code module (you can use the text module, but you run the risk of WordPress stripping out the code when you make any edits and have to do it all over again). Add the title you want. In my Example, I use: “Please Pin Me 😊”. I use the h3 title tags. Here’s what the code looks like before adding the link info.
<h3>Please Pin Me :)</h3>Note: I find it easiest to put the code in an open text document to work with. And then when you have added the couple of links you need, then just cut and paste it into the code or text module.
Step 2
Turn the title into a link by adding the following code:
Linkable Text for Title
<a href="https://www.pinterest.com/pin/create/button/?url=https://www.TheLocationOfThePageYouWantPinned.com/&media=https://www.YourURL.com/PinterestImage.jpg" alt="Your Pin Title"><h3>Please Pin Me :)</a></h3>I’ll break down the code for you. The first part takes you to the Pinterest site and tells the site you are creating a pin. You’ll just leave this as is.
https://www.pinterest.com/pin/create/button/The second part is the URL of the site you want pinned. Here you will add the page you want to the pin to point to (it’ll be the page you are creating the graphic on). So you will replace the https with your page.
?url=https://www.TheLocationOfThePageYouWantPinned.com/The third part is the location of the graphic you want pinned. You can find the location of your image by looking in your media folder and on the righthand side, about halfway down you will see the link. See my photo below the code for an example. Or, in most browsers you can right click on the link and select copy link location. Or finally, in the step below when you add the image using the image module you can get it there.
&media=https://www.YourURL.com/PinterestImage.jpgThe final part is to add the title for Pinterest to use. We do this by setting up an alt tag. You’ll replace the “Your Pin Title” with your own title.
alt="Your Pin Title"Step 3
Now just below the text box with the title, add an image module. Upload the image you want to have pinned. In the link area, you are going to enter the following link. Be sure to change the info to your stuff the same way we did in Step 2. Actually, you’re going to use the exact same code that is found in between the paragraph marks.
This Code Goes in the Link Area of the Image Module
https://www.pinterest.com/pin/create/button/?url=https://www.TheLocationOfThePageYouWantPinned.com/ &media=https://www.YourURL.com/PinterestImage.jpg"
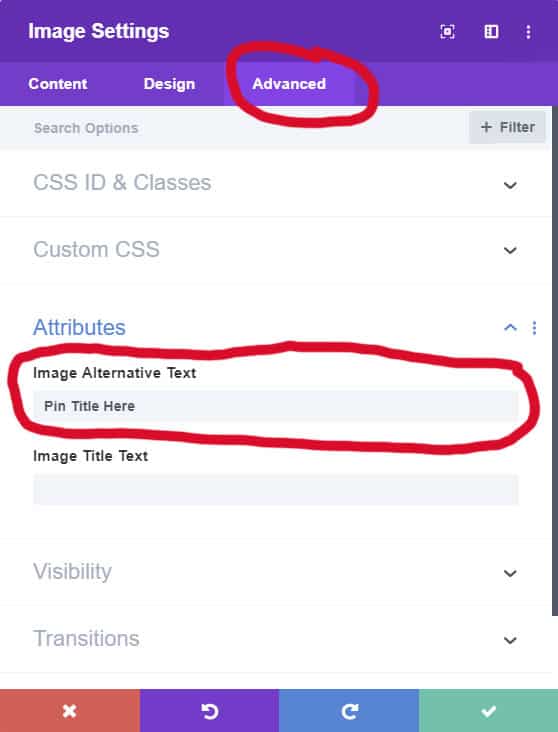
In the Image Module, click on the Advanced tab and add your Pin Title to the Image Alternative Text within Attributes.
To see it in action, click on the Pinterest Board title on this page and pin it. Here’s the finished code this page uses:
The Final Code
<a href="https://www.pinterest.com/pin/create/button/?url=https://dividude.com/easy-ways-to-add-pinterest-board-pins-to-divi/&media=https://dividude.com/wp-content/uploads/2019/09/Pinterest_Titles_Add_Pinterest_Pins_To_Divi.jpg" alt="3 Easy Ways to Add Pinterest Pins to Divi">
<h3>Please Pin Me 🙂</h3></a>
Pinterest Method 2: Hide It Within Another Picture
If you don’t want to add a graphic to your sidebar, or elsewhere in your post, then hiding the Pinterest Board graphic within another image on the page is a good way to do it. You will need to use a Text Module or Code Module to insert your image (I recommend Code Module). Also, this method works if the user has the Pin-It (or Pinterest Save Button, whatever it’s being called now) browser extension. The browser extension can be found here for Chrome, and here for Edge, and here for Firefox. People who are serious about their Pinterest boards already have this extension installed. Trust me.
Here’s the code you’ll need. We’ll replace the text with the actual links for where the images are located on your server.
<img src="https://www.YourURL.com/ImageYouWantDisplated.jpg" alt="Your Pin Title" data-pin-media="https://www.YourURL.com/PinterestImage.jpg" />
As I noted in Method 1, and will no doubt note it below in Method 3, I find it easiest to put the code in an open text document to work with. And then when you have added the couple of links you need, then just cut and paste it into the text or code module.
Step 1
Upload any image or graphic you want displayed on your page. When you upload it, you will see the image’s link on the righthand side. Copy it.
If you’re using an existing page that already has an image, then open up the image module where it is located and copy the link. Now delete the image module, because you won’t need it. (we’ll be adding a code module in step 3 in place of the image module here).
After you copied the image location, paste it into the above code where it says (just replace the URL link, leave quotation marks):
src="https://www.YourURL.com/ImageYouWantDisplayed.jpg"
Step 2
Upload the graphic you want to use for Pinterest. Remember, it’s best to use 735px (wide) x 1102px (high). When you upload it, you will see the image’s link on the righthand side. Copy it.
If you’ve already uploaded it, then search your media library for it. I find it best to right click on Media in the WordPress sidebar menu and open in new tab. That way you don’t have to go back and forth on the page you’re working on. When you select it within the library you will see a URL link on the right hand. Copy it.
After you copied the image location, paste it into the above code where it says (just replace the URL link, leave quotation marks):
data-pin-media="https://www.YourURL.com/PinterestImage.jpg"
Step 3
Now add a code module to where you want the image located on your web page. You can use the text module, but I find that sometimes WordPress (or Divi) strips the code from it whenever you open it to make a change. So I find it best just to stick with the code module, which was made to apply code.
Now copy all the code you have in your open text editor and paste it in the code module. Stylize the code module how you want to make the image as you want it to on the page. If you decide to use the Text Module, make sure you are in the Text tab (and not the Visual tab). Save everything. You ought to now see the image you want displayed, and when you pin it, it will show the image you want on Pinterest.
Here’s how it will look:
What we did was tell Divi to display one image, while telling Pinterest to utilize a different image. Pretty nifty, eh?
If you want to see it in action, go to my home page (it will open in another window) and pin it to your board. Then go on and read the next method. Remember, you have to have the Pin It extension installed.
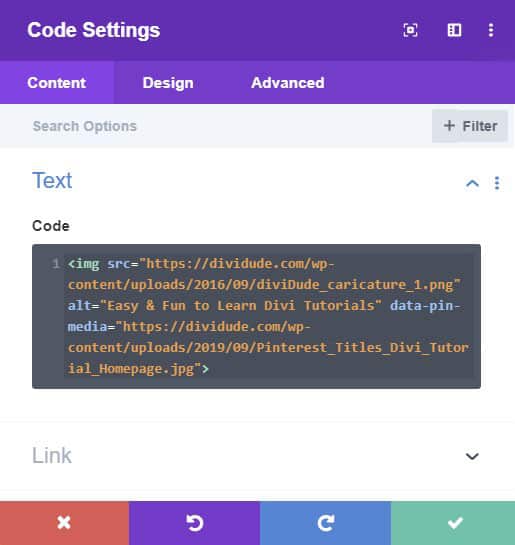
Here’s the code I used on the above link example so you can see how it looks and works in a functioning example.
<img src="https://dividude.com/wp-content/uploads/2016/09/diviDude_caricature_1.png" alt="Easy & Fun to Learn Divi Tutorials" data-pin-media="https://dividude.com/wp-content/uploads/2019/09/Pinterest_Titles_Divi_Tutorial_Homepage.jpg">Method 3: Hide It In Plain Site
Hiding the Pinterest Board title in plain site is the third option. I would use this method if I didn’t have any photos to hide my Pinterest Board graphic behind. This method works in combination with the Pin-It browser extension. (see method #2 for where to get extensions).
If you are using a plugin to lazy load your images, this method may not work. I use Lazy Load by WP Rocket on my site, and while it is activated, I cannot use this method without adding a bit of code to the image file. I’ll show the code below. Furthermore, some lazy load plugins allow you to enter a class name to ignore, which will enable you to use this method. It’s best to check with your lazy load plugin prior to implementing this method.
Note: Even though the image is hidden, it still loads. Which may affect your site’s speed. So, make sure the photo is optimized. I like to use Short Pixel to optimize all my images.
Step 1
Let’s start by creating a bit of custom CSS so we don’t have to add custom CSS to the modules every time we want to create a Pinterest board image. Either open up your child theme style sheet (click here to for my tutorial on how to create a child theme), or use the custom CSS box in Theme Customizer or Theme Options.
Enter the following code (you can change the class name to whatever you prefer, but in this instance I will use: .hidePin) and the save it:
/* HIDE IMAGES TO USE FOR PINTEREST BOARDS */
.hidePin {display: none;}
Step 1 (alternative)
An alternative is to skip this step and do the option 2 in Step 2.
Step 2
Now go to your post or page where you want to insert the Pinterest Board image.
Open up the Visual Builder or Divi Builder and place an image box anywhere you want.
Upload your Pinterest image.
(option 1): Click on the Advanced tab and enter your custom CSS name in the CSS Class text box (in the example here, we use hidePin … make sure you don’t enter the period first).
(option 2): Scroll down in the Advanced tab and make sure you check all the boxes to hide them on Desktop, Tablet and Mobile.
Then save everything and update your page. Double check to make sure the graphic is hidden on all three display types.
If you want to see it in action, go to this page (it will open in another window) and pin it to your board.
Method 3 for WP Rocket’s Lazy Load Plugin
This method is for WP Rocket’s Lazy Load plugin. If you’re using another plugin that lazy loads images, then see their website for how to turn off lazy load for specific images (in some, you just enter the class to ignore, in which case you would do the original Step 1 in this method.)
Insert a Code Module anywhere in your page. Enter the following code:
<div style="display:none" src="https:www.YourImageLocation.com" date-no-lazy="1">
</div>
If you’re looking for a really good caching plugin to work with Divi, then WP Rocket’s is one that I recommend you get. Find out more details and make a wise investment in your site’s speed by following the link.
Bonus Method: Use the Monarch Plugin
Bonus method I should mention, because it’s there. This one actually uses a plugin. The Monarch plugin which you can get for free with your Elegant Themes subscription. If you are still on the fence about Divi or are not currently using it but looking for a great theme, read my Top 10 Reasons Why I use Divi review.
Using the Monarch Plugin to post pinable posts on Pinterest is my least favorite method. Right now, I still have it on my Monarch plugin, because I have not had the time to update all my pages with the above methods. But once I do, I will remove it.
The Monarch plugin works, but you need to have a photo on display for it to be pinable. And then I noticed it doesn’t display photos in a portrait layout (vertical) the way Pinterest prefers them, so you have to choose the pinable graphic with only a part of the information showing. (it will pin correctly on Pinterest, it’s just that the person doing the pinning can’t see most of the graphic before choosing it).
Using Monarch might be the best way to start getting in the habit of creating pin worthy posts, but I would graduate to one of the above methods as soon as possible.
Pinterest Posting Made Easy with Divi – That’s a Wrap
That’s it. Those are the 3 easy methods to add Pinterest board graphics to your Divi website without having to use plugins (plus 1 bonus method where we do).
We always concern ourselves with Facebook and Twitter, but Pinterest is really an excellent way to get your webpages seen. The folks who use Pinterest are diehard pinners (is that a term?), and unlike Twitter or Facebook where once the post has been posted, it dissapears with a scroll, Pins tend to have lasting power. So if you’re not optimizing your site and images for Pinterest, it’s time you start.
One of the software programs that will really help you bring your Pinterest game to the next level is Tailwinds. You can find this amazing program here. It is a valuable asset to anyone who is serious about using Pinterest and Instagram. One of my favorite aspects of Tailwinds is the Tailwind Communities, which gives you a sharing resource with people you trust and whose content you like (and they like yours). Check them out for you and your clients.
Also, be sure to read my tutorial on adding social media icons to your Divi site I wrote.

Must Have Plugins


Faster WordPress Hosting

Affordable Domain Registration
Get $1.00 off.
DiviDudeWeb16

Favorite WordPress Theme

Start Your Newsletter

For Your Inner Nerd

Affiliate marketer: Which means when you click a link and purchase an item, I may receive a commission.
More From Divi Dude

Delete Spam Comments in Bulk Without Plugin on Cloudways
Sometimes you screw up and forget to turn off comments on your WordPress website, or forget to configure your Askimet, or do both, and then you end up with thousands of comments that are nothing but spam. We’re talking hundreds of pages worth of comments that need to…

MailerLite is an affordable, easy-to-use newsletter and email marketing platform
For the longest time I used MailChimp. I was drawn to the 2,000 free subscribers.
But when MailChimp changed how they defined subscribers and made some other not so user friendly changes, I started looking for alternatives. Not just for the free tier, but for my paid subscriber lists (I have clients that send out newsletters and they need more bang for the buck than what many free tier offers).
Delete Spam Comments in Bulk Without Plugin on Cloudways
Sometimes you screw up and forget to turn off comments on your WordPress website, or forget to configure your Askimet, or do both, and then you end up with thousands of comments that are nothing but spam. We’re talking hundreds of pages worth of comments that need to…
